

You’ve got a photo that’s almost perfect. The composition works, the moment is captured, but something feels off. Maybe the lighting is too harsh, or that random person in the background is killing the whole vibe. Traditionally, you’d spend an hour wrestling with Photoshop sliders, hoping you don’t make things worse.
Not anymore. Google’s Gemini AI has flipped the script on photo editing. You don’t need to memorize keyboard shortcuts or understand what a layer mask does. You just need to describe what you want in plain English. The catch? Your words need to be precise enough to guide the AI toward your vision.
This guide shows you exactly how to write prompts that actually work. We’re not talking about generic tips like “be specific” or “use descriptive language.” You’ll get real examples, proven formulas, and practical techniques you can copy and adapt right now. From fixing casual selfies to preparing product shots that convert, these prompts handle the heavy lifting while you focus on the creative direction.
Most importantly, you’ll stop wasting time on edits that miss the mark. The system works, but only when you know how to communicate with it properly.
What Are Gemini Photo Editing Prompts and Why Should You Care?
Gemini photo editing prompts are text-based instructions that tell Google’s AI exactly how to modify your images, delivering professional-quality edits without requiring traditional software skills or technical knowledge.
Think about the last time you tried editing a photo. You probably opened some app, started sliding random controls, and hoped something would click. Maybe it worked, maybe it didn’t. Either way, it ate up your time.
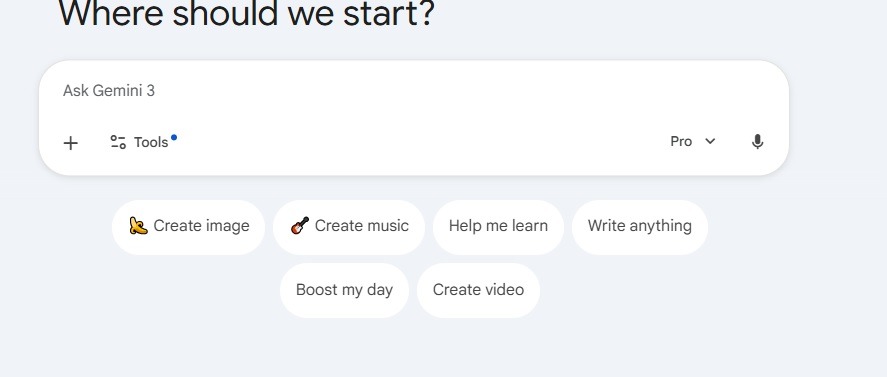
Prompts change that entire workflow. You describe the outcome you want, and Gemini’s Nano Banana Pro model figures out the technical execution. Instead of manipulating pixels yourself, you’re directing an AI assistant that already knows how to balance exposure, adjust colors, and remove distractions seamlessly.
Here’s what makes this approach different. Traditional editing forces you to work backward from the tools. You think, “What can this curve adjustment do?” With prompts, you work forward from your goal. You think, “I want warmer skin tones,” and the AI maps that intention to the right technical adjustments.
Why This Matters More Than You Think
The shift isn’t just about convenience. Prompts give you access to editing capabilities that used to require years of training. Color grading that mimics film? Background removal that looks natural? Lighting adjustments that preserve texture? All of that becomes possible through clear communication instead of technical mastery.
Plus, you’re not locked into one attempt. Gemini handles multi-turn conversations, which means you can refine your edits iteratively. Make one change, review it, then add another layer. The AI remembers context and builds on previous modifications without starting from scratch each time.
From a practical standpoint, this saves you hours per week if you regularly work with photos. Whether you’re running an online store, managing social media, or just trying to make your vacation photos look decent, faster edits mean more time for everything else.
How Does Gemini Actually Edit Your Photos Behind the Scenes?
Gemini combines natural language processing with semantic image understanding to interpret your editing instructions, then applies precise pixel-level changes while maintaining realistic textures, lighting, and spatial relationships throughout the image.
The technology powering these edits is actually pretty wild when you break it down. Gemini doesn’t just slap filters on your photos. The system analyzes image content at a semantic level, meaning it understands what objects are, how they relate spatially, and what changes would look realistic given the existing context.
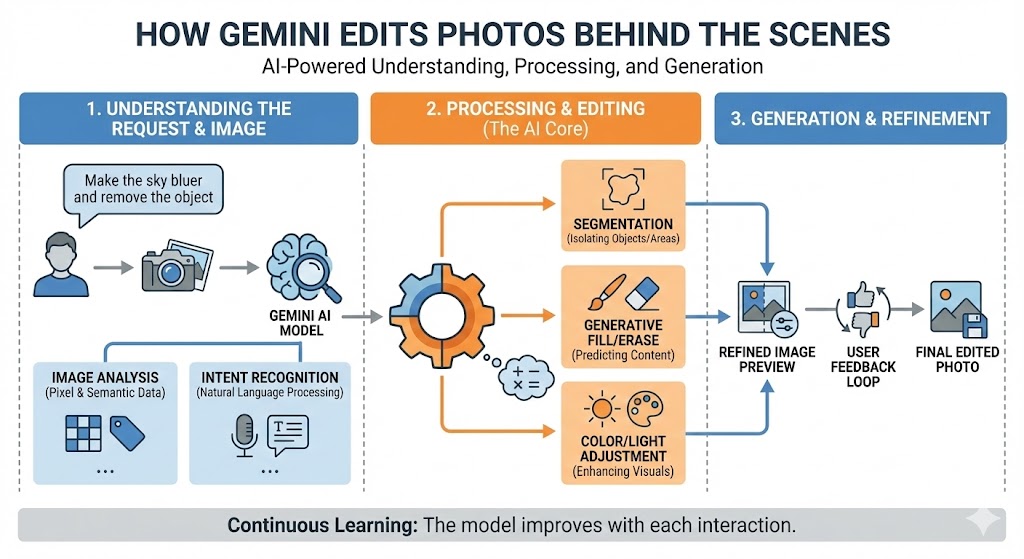
When you type something like “change the sky from overcast to sunset,” the AI doesn’t randomly shift colors. It recognizes the sky region, understands how sunset light affects different parts of a scene, adjusts the color temperature accordingly, and even modifies shadows and highlights on other objects to match the new lighting condition.
The Nano Banana Pro Difference
Google’s Nano Banana Pro model sits at the heart of these capabilities. This isn’t your basic image filter. The model was trained on millions of images and editing examples, learning patterns about how different edits should look under various conditions.
One particularly useful feature is character consistency. If you’re editing multiple photos and want the same person to look consistent across shots, Gemini can maintain facial features, clothing details, and overall appearance even when making other modifications. This matters tremendously for content creators building cohesive visual stories.
Another strength is conversational editing. You can say, “Now make the shadows darker,” and Gemini knows you’re referring to the image you just edited, not starting fresh. This contextual awareness mirrors how you’d work with a human editor, making the process feel intuitive rather than mechanical.
Worth mentioning is the invisible SynthID watermark embedded in all edited images. You can’t see it, but it marks the content as AI-modified. From a transparency perspective, this helps distinguish original photos from edited versions.
What Actually Makes a Prompt Work Well With Gemini?
Effective prompts combine specific subject identification, single-focus editing goals, measurable constraints, and clear preservation instructions that guide the AI toward your exact vision while preventing unwanted changes.
After running hundreds of test prompts, patterns emerge pretty quickly. The prompts that consistently deliver great results share a common structure, while the ones that fail tend to make the same mistakes.
The biggest difference comes down to specificity. Vague prompts like “make this better” or “fix the colors” leave too much interpretation to the AI. Better might mean brighter to you but more saturated to Gemini. Fixed colors could go warmer, cooler, more vivid, or more muted. Without clear direction, you’re gambling.
Building Blocks of Strong Prompts
- Start with subject identification. Tell Gemini what part of the image matters most. “The woman in the center wearing blue” or “the coffee mug on the wooden table” gives the AI a focal point. Everything else becomes context that should support, not compete with, the main subject.
- Pick one primary transformation. Trying to change lighting, remove backgrounds, adjust colors, and retouch skin all at once creates chaos. Focus on the single most important improvement first. You can always layer additional edits afterward.
- Add numerical constraints when possible. Instead of “brighten slightly,” try “increase brightness by 10-15%.” Numbers give Gemini a target range rather than forcing it to guess what “slightly” means to you. This works for saturation, contrast, blur amounts, and other measurable adjustments.
- Specify what must stay unchanged. This protects elements you already like. “Adjust background colors without altering skin tones” or “sharpen the product while keeping the soft background blur” sets boundaries that prevent the AI from going too far.
The Language That Gets Results
Technical photography terms help, but you don’t need a film school degree. Words like “highlights,” “shadows,” “midtones,” “saturation,” and “texture” communicate specific image qualities. Gemini understands these terms and applies adjustments accordingly.
In contrast, subjective words create problems. “Beautiful,” “professional,” “modern,” and “clean” mean different things to different people. The AI might interpret “professional” as high contrast black-and-white, while you wanted soft, warm tones with subtle retouching.
Compare these two approaches. Weak: “Make this photo look professional.” Strong: “Increase sharpness by 12%, add 8% more contrast, reduce background saturation by 15%, and keep facial skin tones natural.” The second version removes guesswork and delivers predictable results.
How to Write Your Very First Gemini Photo Editing Prompt
Begin by uploading your image to Gemini, identifying the main subject, choosing one clear improvement goal, writing a prompt with specific constraints, and reviewing the result before adding refinements.
Let’s walk through this with a real scenario. You’ve got a portrait taken indoors with window light. The lighting is decent but flat, lacking the dimension that makes portraits pop. Here’s how to tackle it.
Your Step-by-Step First Edit
- Upload your image to Gemini. Head to gemini.google.com or open the mobile app. Click the image icon and select your photo. Wait until the thumbnail appears, confirming the upload succeeded.
- Look at what needs fixing. Spend 30 seconds analyzing the image. What’s the main issue? In our example, the lighting is too even across the face. There’s no play between light and shadow that creates depth.
- Write your prompt using this formula:
[Action] + [Specific Element] + [Measurement] + [Protection]

Here’s the actual prompt:
“Add soft directional lighting to the portrait as if light is coming from camera left. Increase shadow depth by approximately 20% while preserving natural skin texture and keeping eyes sharp.”
- Generate and wait. Click send or generate. Gemini typically processes edits in 20-60 seconds. Patience pays off here. Don’t interrupt the process.
- Review critically. When the edited version appears, compare it directly to the original. Is the lighting direction correct? Are shadows too strong or too subtle? Did skin texture survive the edit?
- Refine if needed. Follow up with adjustments like “Reduce shadow intensity by 5%” or “Make the transition between light and shadow softer.” Gemini remembers the context and modifies accordingly.
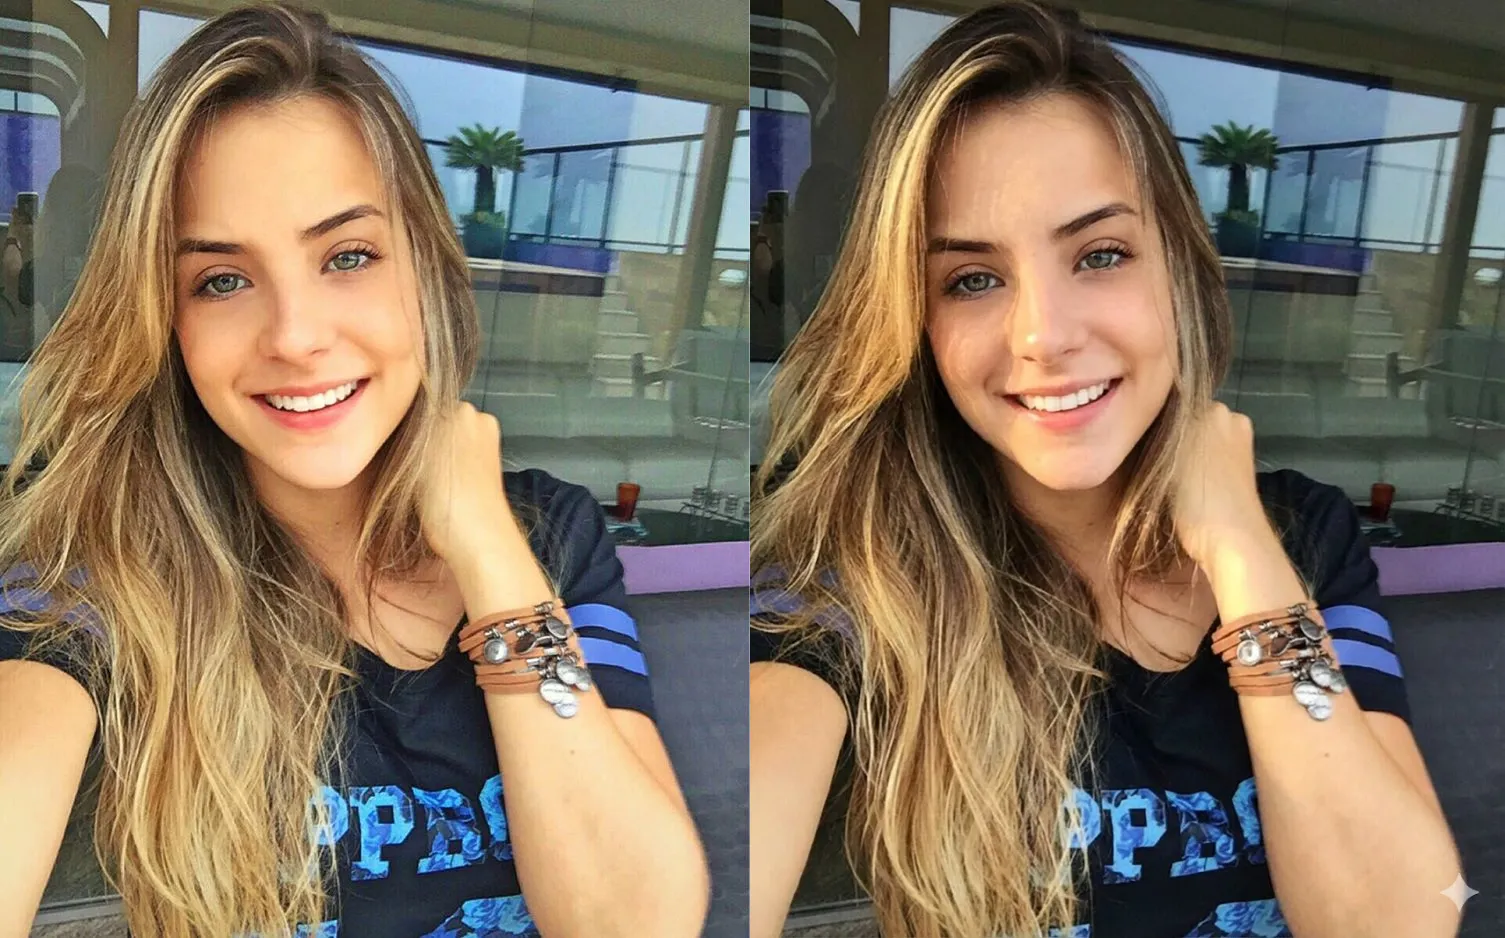
A Safe Starter Prompt You Can Use Right Now
Try this general enhancement on any decent portrait where nothing is badly wrong but it just needs polish:
“Enhance overall image quality by adding 10% sharpness, increasing color saturation by 8%, and boosting contrast slightly. Preserve natural skin texture and avoid over-processing.”
This prompt improves almost any portrait without dramatic changes. It’s conservative enough that you won’t ruin a good photo, but noticeable enough that you’ll see real improvement. Perfect for building confidence with the system.
The 10 Most Useful Gemini Photo Editing Prompt Types
These ten prompt categories cover the most common editing scenarios you’ll face, from basic retouching and background cleanup to advanced color grading and artistic transformations.
Once you understand the fundamentals, having a toolkit of proven prompt types speeds up your workflow dramatically. Instead of inventing prompts from scratch every time, you adapt these templates to your specific images.
Natural Skin Retouching
Most portraits need subtle skin improvements without crossing into that weird plastic filter territory. The goal is removing temporary imperfections while keeping real texture intact.
Your skin is constantly changing. A random pimple today doesn’t represent how you actually look. Gemini can clean that up while leaving pores, natural highlights, and individual skin characteristics alone.
The prompt structure:
“Perform gentle skin retouching on the subject’s face, removing only small blemishes and temporary imperfections. Keep all natural skin texture, pores, and subtle variations visible. Maintain original face shape and proportions exactly. Preserve sharpness in eyes and hair.”

This works because it defines boundaries clearly. “Gentle” and “small” limit the intensity. “Keep natural texture” prevents over-smoothing. “Maintain face shape” stops the AI from accidentally slimming or altering features.
Portrait Lighting Enhancement
Flat lighting kills portraits. Adding dimension through shadows and highlights brings subjects to life. The trick is making artificial lighting adjustments look like they were part of the original scene.
Think about how window light or studio strobes create direction. One side brighter, the other in partial shadow. That contrast gives faces depth and definition.
Try this prompt:
“Enhance portrait lighting by simulating soft window light from the left side. Lift shadow areas by 15% to maintain detail while adding 25% more contrast between lit and shadowed sides. Keep skin tones warm and natural. Preserve catchlights in eyes.”

The percentages give Gemini specific targets. “Soft window light” describes the quality. “Keep skin tones warm” prevents unwanted color shifts that often happen when adjusting lighting.
Cinematic Color Grading
That film look everyone wants? It comes from strategic color separation between highlights and shadows. Typically warmer highlights and cooler shadows, creating visual interest through temperature contrast.
This technique originates from actual film stock characteristics and has been adopted by colorists working on movies and high-end commercials. Now you can apply similar grading without expensive software.
Here’s the prompt:
“Apply cinematic color grading with warm golden tones in highlights and cool teal tones in shadows. Increase the color separation by 30% while keeping skin tones natural. Add 12% more midtone contrast for definition. Include subtle film grain at low intensity for texture.”
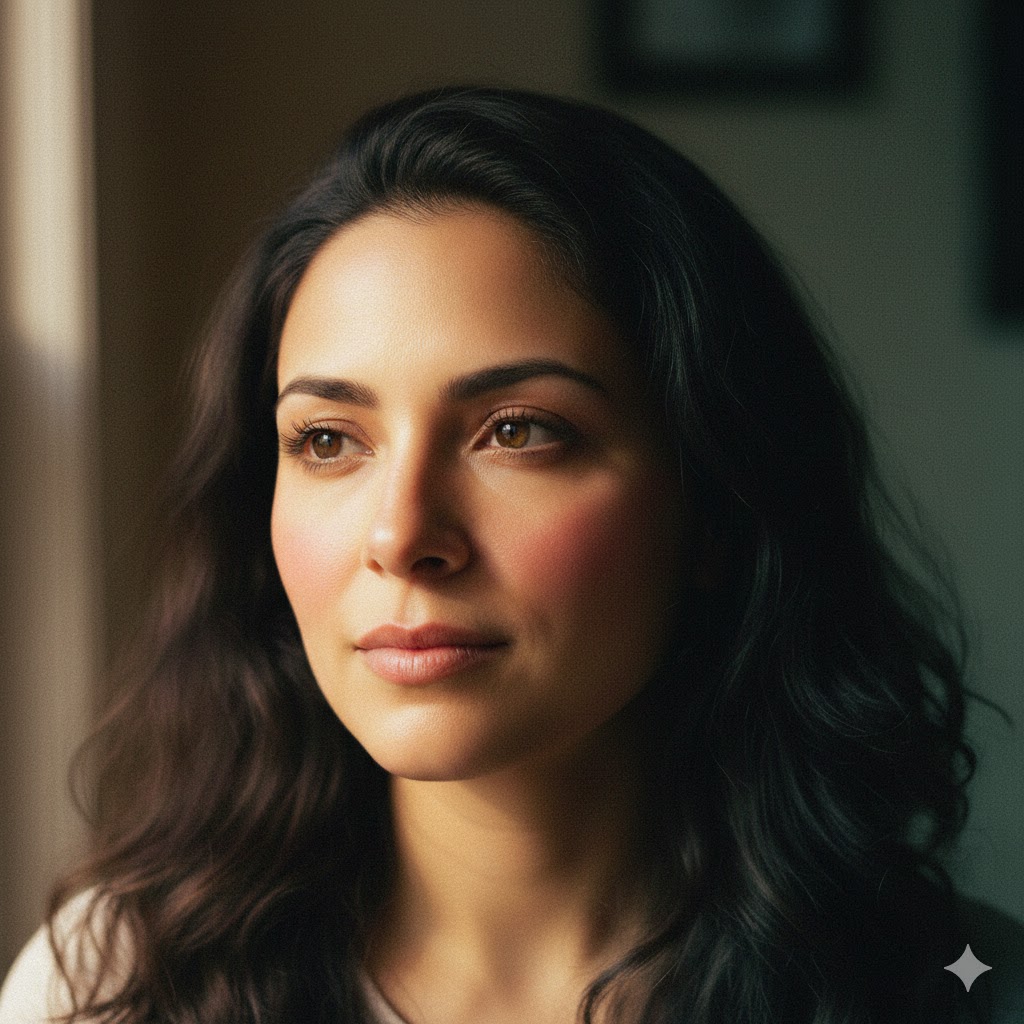
The temperature split creates that recognizable look. “Natural skin tones” prevents people from turning orange or blue. Film grain adds organic texture that makes digital photos feel less sterile.
Background Cleanup and Object Removal
Distracting elements ruin otherwise solid compositions. That random person walking through your shot, the exit sign behind the subject, the trash can at the edge of the frame. All fixable.
Gemini excels at this because it understands spatial relationships and can fill removed areas with textures that match the surrounding environment. The result looks like the object was never there.
Use this approach:
“Remove all distracting background elements including [specific objects to remove]. Fill removed areas with textures matching the immediate surroundings. Maintain original depth of field and background blur characteristics. Keep all edges around the main subject clean and sharp.”
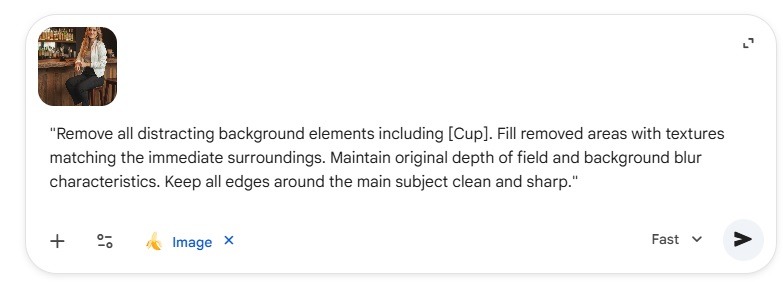
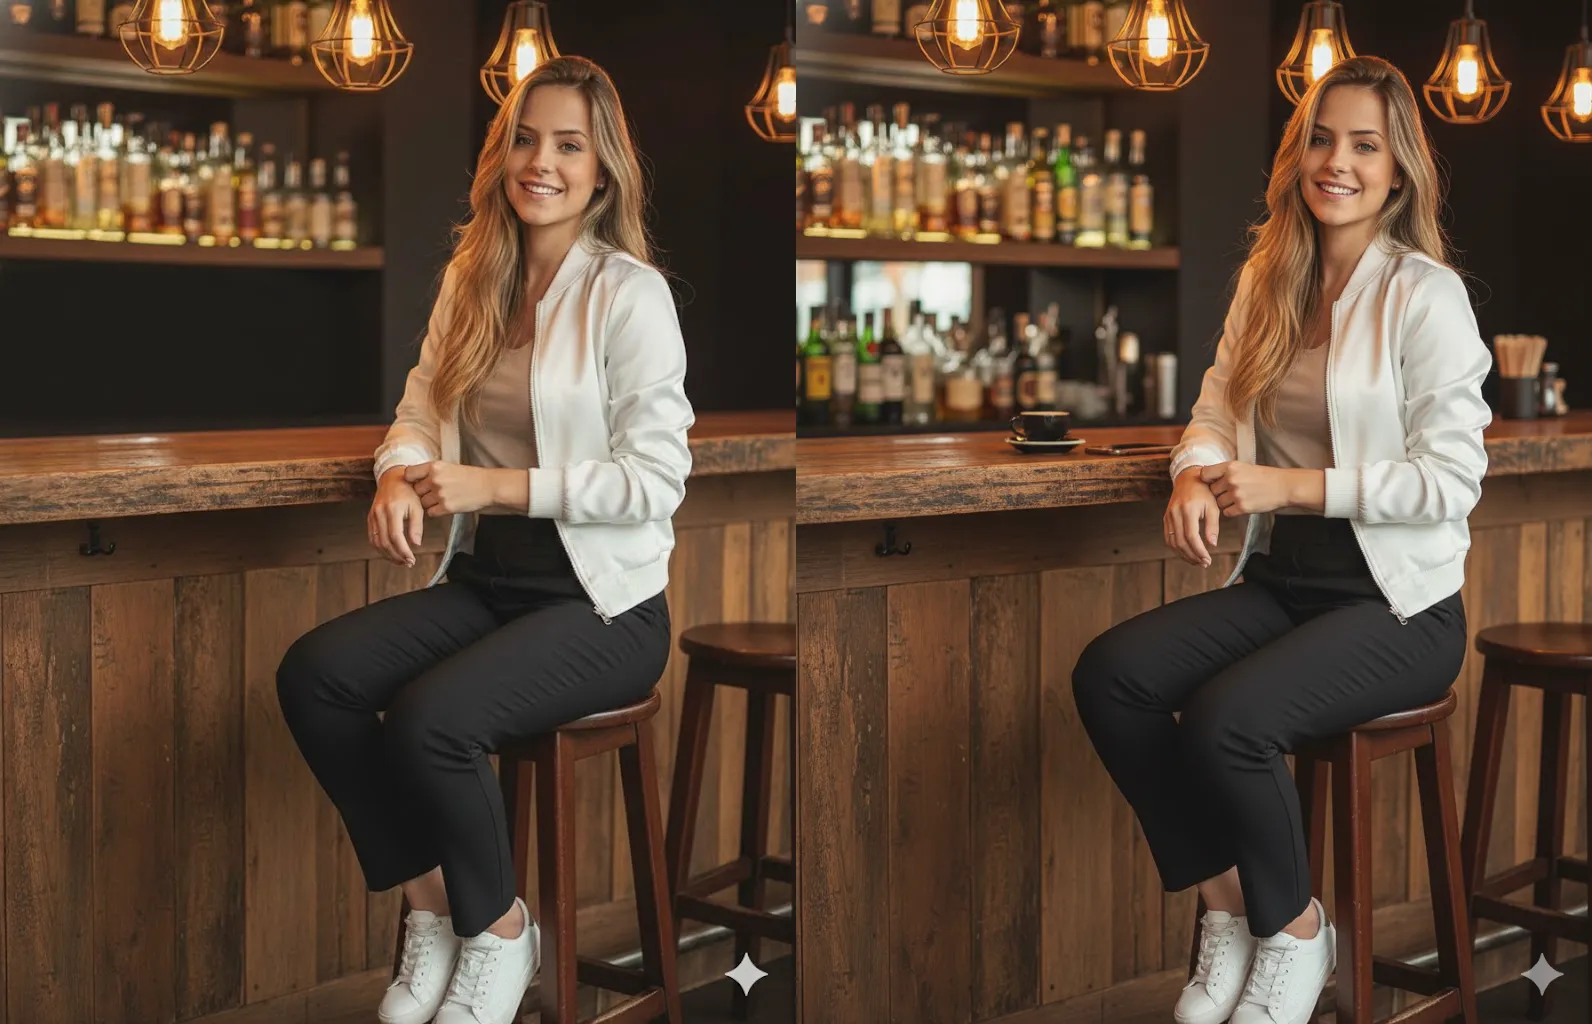
Specify exactly what to remove rather than saying “distractions,” which forces the AI to guess. Mentioning depth of field preservation keeps the background looking natural rather than flat or obviously patched.
Product Photo Polish
E-commerce demands clean, accurate product shots. Colors need to match real life, textures should be visible and tactile, and nothing should distract from what you’re selling.
Small details matter tremendously here. Dust specks, fingerprints, uneven lighting, or color casts can reduce perceived quality and hurt conversion rates.
This prompt works well:
“Polish this product photo by removing dust, fingerprints, and minor surface imperfections. Sharpen edges and material textures selectively to increase perceived quality. Correct any color cast to neutral and accurate. Add a subtle natural reflection below the product for grounding.”
“Neutral and accurate” prevents creative color shifts that might misrepresent the product. The reflection detail adds a professional touch that makes products look premium rather than pasted onto backgrounds.
Makeup Enhancement
Existing makeup often needs small refinements in photos. Mascara that clumped, lipstick that faded slightly, eyeshadow that doesn’t pop. Gemini can enhance what’s already there without looking artificial.
This differs from adding makeup where none exists. You’re amplifying and perfecting existing application rather than starting from scratch.
The prompt to use:
“Enhance existing makeup subtly by deepening eyeshadow colors by 15%, sharpening eyeliner edges slightly, increasing lip color saturation by 12%, and evening out foundation. Avoid adding shine or gloss. Preserve all natural skin texture and avoid the filtered appearance.”
The specific percentages keep changes modest. “Avoid shine” prevents that wet, overdone look. “Preserve texture” ensures the enhancement doesn’t cross into obvious retouching territory.
Outdoor Photo Color Correction
Outdoor shooting introduces color casts from the environment. Green reflections from grass and trees, blue tints from open sky, warm orange from sunset. Sometimes you want those effects, sometimes they’re just distracting.
The goal is restoring accurate colors while maintaining the natural outdoor feel. You’re correcting problems without making the scene look studio-lit or artificial.
Try this prompt:
“Correct outdoor color cast by reducing green tint by 20% and warming overall tone slightly. Recover highlight detail in bright sky areas without creating halos. Maintain natural color gradients throughout. Increase clarity in foliage and distant details by 10%.”
“Reduce green tint” addresses the most common outdoor issue. “Without creating halos” prevents a telltale sign of bad HDR editing. Maintaining gradients keeps skies looking smooth rather than posterized.
Black and White Conversion
Removing color forces viewers to focus on light, shadow, texture, and composition. Done well, black and white images have timeless quality and emotional impact. Done poorly, they look washed out and boring.
The secret is paying attention to tonal range. You need deep blacks for anchor points, bright whites for highlights, and rich midtones that carry detail and texture.
This prompt delivers:
“Convert this photo to black and white with rich tonal range. Create deep blacks that aren’t crushed, bright whites that retain detail, and smooth midtone transitions. Emphasize texture and grain slightly for character. Keep facial tones in the middle range for natural skin rendering.”
“Rich tonal range” signals the AI to preserve full spectrum. “Aren’t crushed” means maintaining shadow detail. Grain adds organic feel that pure digital conversions often lack.
Social Media Optimization
Instagram, TikTok, Facebook—each platform has quirks in how images display, especially on mobile screens. Colors need to pop enough to stop scrolling without looking radioactive. Sharpness needs to survive compression.
Small screens and short attention spans demand images that make immediate impact. Subtlety gets lost. You need slightly stronger adjustments than you’d use for prints or desktop viewing.
Here’s what works:
“Optimize this image for social media by increasing perceived sharpness by 15%, boosting color saturation by 10%, and adding 12% more contrast. Adjust for mobile screen viewing where fine details compress. Keep facial features natural despite the stronger processing. Consider square 1:1 crop if composition allows.”
The higher percentages account for compression and small screen viewing. “Perceived sharpness” uses clarity and texture rather than just edge sharpening, which can look harsh. Mentioning crop reminds Gemini to consider composition for square formats.
Vintage Film Effect
Modern digital photos look clean and sharp, which is great until you want something with more character. Film photography had imperfections that actually added to the appeal—subtle grain, slight color shifts, softer highlights.
This aesthetic comes from physical film characteristics. Different film stocks had distinct color palettes and grain structures. Gemini can simulate those qualities convincingly.
Use this approach:
“Transform this photo to look like it was shot on 1970s film stock. Add moderate film grain throughout. Introduce slight color fading at edges. Make blacks appear slightly milky rather than pure. Create small light leak effect in one corner. Keep the main subject clear and recognizable despite the vintage processing.”
“1970s film stock” gives a specific era and look. “Milky blacks” replicates how film blacks differ from digital. Light leaks were common film imperfections that people now consider desirable aesthetic choices.
Advanced Prompt Techniques That Most People Miss
Taking prompts to the next level requires understanding character consistency, multi-image blending, conversational refinement, style transfer, and conditional preservation—techniques that separate basic edits from truly professional results.
Once you’ve got the basics down, these advanced approaches open up creative possibilities that seem almost magical. They’re not harder to execute, just less obvious when you’re starting out.
Character Consistency Across Multiple Edits
When you’re working on a series of photos—maybe for a portfolio or brand identity—keeping subjects looking consistent across different images matters tremendously. Same person, different outfits or settings, but recognizable as the same individual.
Gemini can maintain facial features, body proportions, and distinctive characteristics across separate edits if you set it up correctly. The trick is establishing the character in your first prompt.
Start with this:
“Create a character reference from this portrait. The subject has [describe distinctive features: eye color, face shape, hair style, build]. This character consistency should be maintained across subsequent image generations and edits.”
Then in follow-up prompts:
“Using the same character from the previous image, now show them in a business setting wearing professional attire.”
The AI remembers the established characteristics and applies them to new contexts. This works remarkably well for creating cohesive visual series without needing the actual person for multiple photoshoots.
Multi-Image Blending for Creative Compositions
Sometimes your vision requires combining elements from different photos. Maybe you shot a great background separately from your subject, or you want to merge two concepts into one surreal image.
Traditional compositing requires masking skills and careful edge work. With prompts, you describe the intended result and let Gemini handle the technical execution.
The process looks like this:
Upload both images, then prompt:
“Blend these two images by placing the subject from the first photo into the environment shown in the second photo. Match lighting direction and color temperature between subject and new background. Adjust shadows and highlights on the subject to fit the new lighting. Keep edges natural with appropriate depth of field transitions.”
Mentioning lighting match prevents the obvious “pasted in” look. Shadow and highlight adjustments ground the subject in the new environment. Edge quality determines whether the blend looks believable or fake.
Conversational Refinement Strategy
One-shot prompts rarely deliver perfection on the first try. The real power comes from iterative refinement, where each prompt builds on previous results.
Think of this like working with an assistant. You give initial direction, review the work, then provide feedback for adjustments. Gemini maintains context throughout the conversation, so you don’t repeat yourself.
The workflow goes:
First prompt: “Enhance lighting on this portrait by adding soft directional light from the left.”
Review the result. Suppose the shadows are too strong.
Second prompt: “The direction looks good, but reduce shadow intensity by about 15%. Keep everything else the same.”
Review again. Maybe the eyes lost some sparkle.
Third prompt: “Increase brightness specifically in the eyes by 10% to restore catchlights.”
Each instruction modifies without starting over. This conversational approach gives you precise control while keeping the process simple.
Style Transfer Applications
Applying the aesthetic of one image to another creates instant visual cohesion. Maybe you love the color palette of a vintage poster and want your photo to match that mood. Or you have a brand style guide and need new photos to fit.
Gemini can analyze style characteristics from a reference image and apply similar qualities to your target photo. This includes color grading, contrast curves, texture qualities, and overall mood.
Here’s how to prompt it:
Upload both images and write:
“Analyze the color palette, contrast style, and overall aesthetic of the first image. Apply those same visual characteristics to the second image while preserving the actual content and subjects. Match the mood and feeling without changing composition or key elements.”
This works particularly well for creating consistent looks across photo collections or matching new content to established brand aesthetics.
Conditional Preservation Masking
Sometimes you want dramatic changes to most of an image but need certain elements protected completely. Traditional editing uses layer masks. With prompts, you use conditional language.
The concept is simple but powerful. You describe changes, then add explicit exceptions for protected areas. Gemini interprets these conditions and applies edits selectively.
Structure it like this:
“Apply dramatic cinematic color grading with strong blue-orange contrast throughout the entire image EXCEPT preserve the subject’s skin tones at their original warmth and saturation. Also keep the brand logo in the background at its exact original colors without any grading applied.”
The “EXCEPT” clause creates protected zones. Being specific about what to preserve prevents the AI from applying global changes where you don’t want them. This technique works for product branding, skin tones, specific objects, or any element that must remain unchanged.
Common Mistakes That Ruin Your Gemini Photo Edits
The most frequent failures come from overloading prompts with multiple goals, using low-quality source images, writing vague descriptions, forgetting to set constraints, and expecting single-shot perfection without iteration.
Knowing what doesn’t work saves you hours of frustration. These mistakes show up constantly, and fixing them immediately improves your results.
Trying to Do Everything at Once
The biggest culprit by far. People write prompts like “fix the lighting, remove the background, change clothes to red, adjust skin, make colors pop, add bokeh, and sharpen the face.” That’s seven different edits in one instruction.
Gemini gets confused about priorities. Which matter most? What if adjustments conflict? The result usually looks muddy or incomplete.
Fix this by focusing. One prompt, one primary goal. Make that edit, review it, then move to the next change. Layering edits in sequence gives you control and produces cleaner results.
Starting With Low-Quality Source Images
AI can enhance photos, but it can’t create detail that doesn’t exist. If your source image is blurry, poorly lit, or shot at low resolution, prompts will only take you so far.
Group photos create problems too. When you upload a shot with five people and ask Gemini to edit “the person,” the AI has to guess which one you mean. Confusion follows.
Start with the best possible source. Decent lighting, proper focus, appropriate resolution. Single subject rather than crowds. Clean composition without major technical flaws. Give the AI good raw material to work with.
Writing Vague, Subjective Descriptions
“Make this look professional.” “Give it a modern vibe.” “Make colors better.” These prompts sound reasonable but contain zero actionable information.
Professional means something different in corporate headshots versus fashion photography versus food blogs. Modern could point to minimalism, bold colors, or high contrast. Better is completely relative.
Replace subjective terms with specific instructions. Instead of “professional,” write “increase sharpness by 10%, add subtle contrast, use neutral color balance.” Replace “modern” with “high contrast, vibrant colors, clean composition.” Swap “better” for “increase saturation by 8%.”
Forgetting Constraint Language
Without limits, AI pushes edits further than you probably want. Ask for “smooth skin” and you might get weird plastic face. Request “vibrant colors” and everything turns neon.
Constraints act as guardrails. They tell Gemini how far is too far, preventing over-processing while still achieving your goal.
Always include preservation statements. “While maintaining natural texture.” “Without creating artificial appearance.” “Keeping colors realistic.” “Preserving original proportions.” These phrases cap the intensity and keep results believable.
Expecting Perfection on First Attempt
Single prompts rarely nail exactly what you envision. That’s normal and expected. Treating each prompt like it must be perfect creates frustration when results fall short.
Photography pros make dozens of adjustments when editing manually. Expecting AI to read your mind and execute flawlessly in one shot sets unrealistic standards.
Plan for iteration from the start. Write your initial prompt knowing you’ll refine it. Review the result critically, identify what worked and what didn’t, then add a second prompt addressing specific issues. This workflow matches how editing actually works.
Ignoring Image Aspect Ratio and Composition
Asking Gemini to crop to square format when your subject is positioned vertically, or requesting landscape orientation for a portrait, forces awkward compromises. The AI will try, but composition suffers.
Same goes for adding elements where no space exists. “Put mountains in the background” doesn’t work when the frame is already filled edge to edge.
Work with your composition, not against it. Check available space before asking for additions. Consider aspect ratio before requesting crops. Let existing composition guide your editing choices rather than fighting the original framing.
Using Group Photos for Individual Edits
“Enhance the woman on the left” assumes Gemini correctly identifies who you mean. In group shots, spatial references get ambiguous. Left from your perspective or the photo’s? Front left or back left?
The AI makes its best guess, but you’re gambling on accuracy. Often the wrong person gets edited, or changes apply to multiple people.
Upload cropped versions for individual editing. Before prompting, crop to just the person you want edited. Upload that isolated image, apply your prompt, then composite back into the group if needed. Extra step, but guaranteed accuracy.
How to Build Your Personal Prompt Library
Creating a collection of tested, proven prompts that work for your specific needs eliminates guesswork and speeds up your editing workflow by 10x while ensuring consistent results across similar photos.
After you’ve run a bunch of edits, patterns emerge. Certain prompts consistently work for headshots. Others nail product photos every time. Specific adjustments suit your style perfectly.
Capturing those winners as templates means you never start from scratch. You grab a proven prompt, swap in specifics for your current image, and generate. Five minutes instead of thirty.
The Structure of Reusable Prompts
Good template prompts have placeholders for variable elements while keeping successful structure intact. You’re not copying word-for-word, you’re adapting a framework.
Here’s an example:
Template: “Enhance [SUBJECT TYPE] by [PRIMARY EDIT] at [PERCENTAGE] intensity. Preserve [PROTECTED ELEMENTS] exactly as shown. [SECONDARY ADJUSTMENT] without affecting [CONSTRAINT].”
Filled in: “Enhance portrait skin by softening texture at 15% intensity. Preserve eye sharpness and hair detail exactly as shown. Warm skin tones by 5% without affecting clothing colors.”
The bracketed sections change per photo. The structure and constraint language stay consistent. This formula becomes muscle memory.
Organizing by Category
Sort your library by editing type rather than chronologically. Categories might include:
Portrait Retouching: Skin smoothing, blemish removal, makeup enhancement
Lighting Adjustments: Directional light, shadow lifting, highlight recovery
Color Work: Grading, correction, saturation, temperature shifts
Background Edits: Cleanup, replacement, blur adjustments
Style Effects: Black and white, vintage, cinematic, HDR
When you need a portrait edit, you immediately know where to look. No scrolling through random past prompts hoping to find something relevant.
Testing and Refinement Process
Not every prompt you save will stand the test of time. Some work great once then fail on different images. Others need small tweaks to become truly reliable.
Build in a testing phase. When you write a prompt that delivers great results, save it as “candidate.” Use it on three different similar images. If all three work well, promote it to your main library. If results vary, note what conditions matter and adjust the prompt accordingly.
For instance, a lighting prompt might work perfectly on photos with plain backgrounds but fail on busy scenes. Document that limitation. Adjust the prompt to specify “for simple backgrounds” or create a separate version for complex situations.
Version Control for Improvements
As you discover better techniques, your prompts evolve. Instead of deleting old versions, keep them with version numbers or dates.
“Portrait skin smoothing v1” might be your original attempt. “Portrait skin smoothing v2 (March 2026)” is the improved version after you learned about texture preservation. “Portrait skin smoothing v3 – professional headshots” is specialized further.
This archive shows your progression and gives you options. Sometimes an older, simpler version works better for specific situations than your latest complex prompt.
Sharing and Community Learning
Photography communities, AI editing groups, and social media channels constantly share working prompts. Tap into that collective knowledge.
When you find someone’s prompt that delivers great results, save it with credit to the source. Test it on your images. Adapt it to your style. Add your modifications and share back.
This reciprocal learning accelerates everyone’s progress. You benefit from others’ discoveries, they benefit from yours, and the whole community gets better prompts faster than anyone could develop alone.
Gemini Photo Editing vs Traditional Software: When to Use Each
Gemini excels at quick, straightforward edits and creative transformations through natural language, while traditional software like Photoshop remains superior for precise pixel-level control, complex compositing, and workflow automation.
Understanding the strengths and limitations of each approach helps you choose the right tool for each project. Sometimes that’s Gemini, sometimes it’s Lightroom or Photoshop, sometimes it’s both in combination.
Where Gemini Wins
Speed on common tasks. Removing backgrounds, adjusting exposure, changing colors, cleaning up minor distractions—all of these happen faster through prompts than manual editing. Ten seconds versus ten minutes adds up quickly across multiple images.
Accessibility for non-experts. If you don’t know what a curves adjustment does or how layer masks work, Gemini gives you access to powerful editing capabilities immediately. The learning curve essentially disappears.
Creative experimentation. Trying wild ideas costs nothing but a few seconds. “What if this was painted?” or “How would this look in 1920s style?” You can test concepts rapidly without investing time in technique.
Content-aware intelligence. Gemini understands semantic content in ways traditional tools don’t. It knows what “make the sky dramatic” means contextually rather than requiring specific slider adjustments.
Where Traditional Software Still Rules
Precision control. When you need to adjust one specific color channel in one specific region by an exact amount, nothing beats manual control. Sliders and masks give you pixel-perfect authority.
Complex compositing. Building images from multiple sources with different lighting conditions, perspectives, and resolutions requires layer management, sophisticated masking, and blend modes. Prompts can’t match that level of compositional control yet.
Batch processing. Applying identical edits to 500 product photos is trivial in Lightroom. With Gemini, you’d need to prompt each image individually or find workarounds. Traditional software was built for workflow efficiency at scale.
Non-destructive workflow. Professional editing demands the ability to revisit and adjust any edit at any time. Layer-based editing preserves that flexibility. Once Gemini processes an image, that edit is baked in.
Professional output requirements. Commercial work often requires specific color profiles, bit depths, resolution standards, and format specifications. Traditional software gives you granular control over output parameters that Gemini currently doesn’t expose.
The Hybrid Approach That Works Best
Smart workflow combines both tools where each excels. Use Gemini for initial heavy lifting, then polish in traditional software. Or do precise work in Photoshop, then use Gemini for creative finishing touches.
Here’s a practical example:
You’re preparing product photos for an online store. Start in Gemini with “Remove background completely, leaving only the product on transparent background. Clean up dust and minor scratches.” That handles the tedious work in seconds.
Export the result, then open in Photoshop. Make precise color corrections to match your brand standards. Add drop shadows that follow your style guide. Compose multiple products into layout templates. Save with proper color profiles for web.
This workflow took maybe five minutes total instead of thirty. Gemini handled the boring stuff, Photoshop delivered the precision your brand requires.
Real-World Gemini Photo Editing Prompt Examples You Can Copy
These 20 copy-paste prompts cover the most common editing scenarios you’ll face, from casual social media posts to professional portfolio work, giving you immediate results while teaching effective prompt structure through practical examples.
Skip the learning curve and jump straight to results. Each prompt below works right now. Just replace bracketed sections with your specifics.
For Portrait Photography
Professional headshot transformation:
“Convert this casual photo into a professional headshot suitable for LinkedIn. Add soft, even studio-style lighting from slightly above and in front. Increase sharpness on eyes and hair by 12%. Smooth skin gently while preserving natural texture and pores. Ensure the background is clean or slightly blurred to maintain focus on the face. Keep clothing colors accurate.”
Dramatic portrait lighting:
“Create dramatic portrait lighting by darkening the right side of the face by 30% while keeping the left side well-lit. Add a subtle rim light effect along the shadowed edge. Increase overall contrast by 15% without crushing shadows. Keep eye details bright and sharp on both sides.”
Natural outdoor portrait enhancement:
“Enhance this outdoor portrait by correcting green color cast from surrounding trees. Warm skin tones by 8% for natural appearance. Increase clarity in eyes and hair by 10%. Soften harsh shadows under eyes and nose without creating flat lighting. Maintain natural background colors and depth.”
For Product Photography
Clean e-commerce product shot:
“Prepare this product image for online store use. Remove all background distractions, leaving only the product visible. Clean any dust, fingerprints, or surface imperfections. Sharpen product edges and texture details by 15% to increase perceived quality. Ensure colors are accurate and neutral, correcting any lighting color cast. Add subtle reflection beneath product for professional appearance.”
Lifestyle product context:
“Place this product into a natural lifestyle context that suggests everyday use. The setting should feel authentic and relatable rather than staged. Ensure lighting on the product matches the environment convincingly. Keep the product as the clear focal point while the background provides context. Maintain accurate product colors and details.”
Texture emphasis for materials:
“Emphasize the texture and material quality of this product. Increase micro-contrast in surface details by 20% to make texture visible and tactile. Add slight directional lighting that creates shadows in texture grooves. Maintain accurate color representation. The goal is making viewers feel they can touch and understand the material quality through the photo.”
For Social Media Content
Instagram-optimized edit:
“Optimize this photo for Instagram feed viewing on mobile screens. Increase perceived sharpness by 12% for small display. Boost color saturation by 10% so it stands out in scrolling feed. Add 8% more contrast for punch. If composition allows, suggest square 1:1 crop that maintains the main subject. Keep facial features natural despite stronger processing.”
Moody aesthetic edit:
“Create a moody, atmospheric aesthetic with crushed blacks and muted colors. Reduce overall brightness by 15% while keeping the main subject visible. Desaturate colors by 20% except for one accent color that should remain vibrant. Add subtle grain for texture. The mood should feel contemplative and artistic rather than bright and energetic.”
High-energy vibrant edit:
“Transform this into a high-energy image with vibrant colors and strong contrast. Increase saturation by 25% across all colors. Boost highlights significantly while maintaining detail. Add 20% more contrast for impact. Slightly increase sharpness for crispness. The result should feel exciting and attention-grabbing without looking oversaturated or fake.”
For Creative and Artistic Edits
Film noir black and white:
“Convert to dramatic film noir black and white with deep, rich blacks and bright, detailed highlights. Increase contrast by 30% for dramatic effect. Add directional lighting that creates strong shadows suggesting mystery. Include subtle grain for classic film texture. The mood should feel like a 1940s detective movie.”
Vintage 1970s film aesthetic:
“Transform this into authentic 1970s film photography aesthetic. Add moderate warm color shift toward yellow-orange. Create slight color fading especially at edges. Make blacks appear milky rather than pure. Add visible but not excessive film grain. Include small light leak effect in upper corner. Keep main subject recognizable despite vintage processing.”
Dreamy soft-focus effect:
“Create dreamy, romantic soft-focus effect while keeping the main subject’s eyes sharp. Add subtle glow around highlights. Slightly desaturate most colors except warm tones like pinks and golds. Reduce contrast by 15% for softer feel. Add very subtle blur to background elements. The result should feel ethereal and romantic without looking like a mistake.”
For Corrective Edits
Harsh sunlight correction:
“Correct harsh midday sunlight by softening hard shadows on the face. Reduce shadow darkness by 25% while maintaining definition. Recover blown highlight details in bright areas. Balance overall exposure to reduce extreme contrast. Keep skin tones natural while preventing the flat appearance that comes from over-correction.”
Indoor yellow lighting fix:
“Correct strong yellow-orange color cast from indoor tungsten lighting. Shift overall temperature toward neutral by removing approximately 30% of warm tones. Ensure skin tones appear natural rather than yellow or green. Maintain warmth in intentionally warm elements while correcting the unwanted cast. Check that whites appear truly white rather than cream.”
Underexposed recovery:
“Recover this underexposed image by increasing overall brightness by 30%. Lift shadows significantly to reveal hidden detail. Reduce contrast slightly to prevent blocking. Add clarity to counteract muddiness that comes from brightening. Check that noise doesn’t become excessive in shadow areas. The recovered image should look intentionally moody rather than accidentally dark.”
For Background Edits
Background blur increase:
“Increase background blur to create stronger subject separation. The effect should look like natural shallow depth of field from a fast lens rather than obvious post-processing. Keep edges around the subject clean without halos or artifacts. Gradually increase blur with distance from subject. Maintain color and tone in blurred areas.”
Background replacement:
“Replace the current background with [describe new setting]. Match lighting direction and quality between subject and new background. Adjust subject’s shadows and highlights to fit new lighting environment. Ensure edges transition naturally with appropriate depth of field. The integration should look like subject was originally photographed in the new location.”
Distraction removal:
“Remove these specific distractions from the background: [list elements to remove]. Fill removed areas with textures and colors matching immediate surroundings. Maintain original depth of field and any existing blur. Keep edges clean around remaining elements. The background should look naturally empty rather than obviously edited.”
How Different Industries Use Gemini Photo Editing Prompts
Real estate, e-commerce, social media marketing, personal branding, and creative portfolios each have specific prompt strategies optimized for their unique needs and audience expectations.
Different fields face different editing challenges. Understanding industry-specific approaches helps you apply relevant techniques to your own work.
Real Estate Photography Needs
Property photos sell homes faster when they look bright, spacious, and inviting. But real estate shooting happens during available showing times, often with less-than-ideal lighting.
Typical real estate prompt:
“Enhance this interior real estate photo by brightening the room by 25% for an open, inviting feel. Correct any color cast from mixed lighting sources. Increase clarity and sharpness throughout to show details clearly. If windows are blown out, recover some detail without creating unrealistic darkness. Straighten any tilted vertical lines. The result should feel welcoming and spacious.”
Real estate agents using prompts like this report saving 15-20 minutes per listing while maintaining consistent quality across all property photos. That time savings adds up quickly when managing multiple listings.
E-Commerce Product Requirements
Online stores live or die by product presentation. Customers can’t touch or examine items physically, so photos must convey quality, color, and details accurately.
Standard e-commerce prompt:
“Prepare this product photo for online retail use. Remove background completely or replace with pure white. Clean all dust, scratches, fingerprints. Sharpen product details and textures by 18% to showcase quality. Ensure colors are accurate to real-world appearance, correcting any lighting color casts. Add natural-looking shadow beneath product for grounding. The result must represent the actual product customers will receive.”
E-commerce operations using prompt-based editing report 3x faster image preparation compared to manual Photoshop work, while maintaining acceptable quality standards for online retail.
Social Media Influencer Workflow
Content creators need consistent aesthetic across posts while keeping up with demanding posting schedules. Spending an hour per image doesn’t scale when you need daily content.
Influencer aesthetic prompt:
“Apply my signature aesthetic: warm tones with emphasis on golden hour lighting, slightly faded blacks for vintage feel, boosted skin tone warmth by 10%, increased clarity in eyes and hair, background slightly desaturated to focus attention on subject. Overall brightness +12%. The edit should match my feed’s existing style for visual cohesion.”
Successful influencers often create custom prompts that define their unique aesthetic, then apply that same prompt to all content. This maintains brand consistency while dramatically reducing editing time.
Professional Portfolio Development
Photographers and creative professionals need portfolio pieces that showcase technical skill while maintaining artistic vision. Edits should enhance rather than distract.
Portfolio refinement prompt:
“Enhance this portfolio piece with subtle, professional refinements that showcase the original composition and lighting. Increase micro-contrast by 8% to reveal texture and detail. Make precise color adjustments that enhance mood without altering the fundamental aesthetic. Clean any technical flaws that distract from the subject. The edit should feel invisible while making the image technically excellent.”
Portfolio work demands restraint. The prompt emphasizes subtlety and enhancement rather than transformation, ensuring the photographer’s original vision remains central.
Corporate and Business Communication
Corporate communications require clean, professional imagery that aligns with brand standards. Photos should feel polished without artistic flourishes that might distract from the message.
Corporate communications prompt:
“Prepare this image for corporate use. Apply clean, professional enhancement without artistic effects. Ensure lighting is even and flattering. Colors should match brand guidelines [specify colors if relevant]. Remove any casual or distracting elements. Increase clarity for sharp presentation. The result should feel polished and professional without drawing attention to the editing itself.”
Corporate users particularly value prompt-based editing for maintaining consistency across large image libraries and multiple contributors who may have varying technical skills.
Troubleshooting When Gemini Doesn’t Deliver What You Expected
When results miss the mark, the problem usually stems from ambiguous subject identification, conflicting instructions, unrealistic expectations for source image quality, or insufficient iteration rather than AI limitations.
Even with solid prompts, you’ll occasionally get results that don’t match your vision. Knowing how to diagnose and fix problems saves frustration.
The Edit Went Too Far
Gemini over-processed your image. Skin looks plastic, colors are neon, contrast is extreme. The AI misinterpreted intensity.
The fix is adding numerical limits. Return to your prompt and add specific percentages. Instead of “smooth skin,” write “smooth skin by 15% while keeping visible texture.” Instead of “vibrant colors,” write “increase saturation by 8%.” Numbers constrain the AI’s interpretation.
Also check for constraint language. Did you include “while maintaining natural appearance” or “without creating artificial look”? These phrases act as guardrails.
The Wrong Area Got Edited
You wanted the subject’s clothes changed but Gemini modified the background too. Or you asked for facial retouching and the entire image got smoothed.
The solution is clearer subject definition. Rewrite your prompt with explicit boundaries. “Edit only the subject’s shirt, making no changes to background, face, or other clothing.” Or “Apply retouching exclusively to facial skin, leaving hair, eyes, clothing, and all other elements exactly as they appear originally.”
Spatial language helps too. “The woman in the center foreground” is clearer than “the woman.” “The product occupying the right third of the frame” beats “the product.”
Colors Shifted Unexpectedly
Your edit changed colors in ways you didn’t request. Maybe skin tones went orange, or the whole image got a weird green cast.
Check for unintended color implications in your prompt. Words like “warm” push toward orange-yellow. “Cool” shifts toward blue. “Vibrant” can shift hues toward more saturated primaries. If you want brightness changes without color shifts, explicitly state “increase brightness while maintaining exact current color balance and hue.”
Another approach is adding color preservation statements. “Keep skin tones in the natural range between peach and tan.” “Maintain clothing colors exactly as shown.” These protect specific elements from color drift.
The Background Looks Fake After Object Removal
You removed something from the background but the filled area looks obviously patched, blurred, or mismatched.
Try adding texture guidance. Rewrite as “Remove [object] and fill the space with texture that exactly matches the immediate surrounding area, maintaining the same level of detail, grain, and characteristics.”
Also mention depth of field. “Maintain the background blur and depth of field in the filled area” helps Gemini understand the spatial context. Sometimes adding “extend existing patterns naturally” works when you’re removing objects from textured backgrounds.
The Edit Doesn’t Match Your Reference Concept
You described what you wanted but the result looks nothing like your vision. Maybe you asked for “film noir lighting” and got something else entirely.
Try using comparison language. Upload a reference image showing the look you want, then prompt: “Make this photo’s lighting and mood match the reference image I’ve provided. Analyze the contrast, shadow placement, and overall tone of the reference, then apply similar characteristics to this photo.”
Alternatively, break down the style into specific components. Instead of “film noir,” specify “very high contrast with deep black shadows covering 40% of the face, bright highlights on one side, overall dark mood with dramatic light-to-shadow transition.”
Results Vary Wildly Between Similar Prompts
The same prompt works great on one photo but fails on another similar image. Consistency seems random.
This usually indicates your prompt relies on context-specific interpretation. A prompt that says “enhance the main subject” might work when one person dominates the frame but fail when composition is more balanced.
Make prompts more explicit about identifying the subject. Instead of “main subject,” specify characteristics: “the person wearing blue in the center” or “the largest product in the frame.” Remove assumptions about what’s obvious.
The Future of AI Photo Editing: What’s Coming Next
Emerging developments in multimodal AI, real-time editing, video integration, and deeper creative control suggest photo editing will become more conversational, intuitive, and seamlessly integrated with other creative workflows.
Technology moves fast. Understanding where editing AI is headed helps you prepare and adapt your workflow as new capabilities emerge.
Real-Time Conversational Editing
Current workflow involves writing prompts, waiting for generation, reviewing results, then writing new prompts. The next generation will feel more like conversation with immediate visual feedback.
Imagine speaking edits aloud while watching changes happen in real time. “Brighten the left side… more… too much, back it off… good, now add some warmth… perfect.” This conversational approach mirrors how you’d direct a human editor.
Early versions of this technology are already appearing in beta tests. Within 12-18 months, expect mainstream availability. The implications for workflow speed are dramatic.
Video Editing Through Similar Prompts
Photos are just frames. Video is a sequence of frames. The same prompt technology extending to video editing represents the logical next step.
“Apply this color grade consistently across the entire video clip” or “Remove the background person walking through the shot” would work the same way photo prompts do now, just processing temporal data instead of single images.
Google and other companies are actively developing video editing capabilities. Expect initial releases in 2026 with wider availability in 2027. The workflow advantages are obvious for anyone creating video content.
Deeper Style Customization
Current style transfer works well but remains somewhat generic. Future systems will learn your specific aesthetic preferences through observation rather than explicit instruction.
The AI would analyze your editing history, identify patterns in your choices, and automatically apply your style to new images. You’d still have control through prompts, but the starting point would match your preferences without specifying every detail.
This personalized approach could save enormous time for professionals with established visual styles. Your “house style” becomes a learned model rather than a saved preset.
Integration With Other Creative Tools
Editing AI currently lives in isolated platforms. The future involves seamless integration across your entire creative workflow.
You might shoot photos on your phone, where AI instantly applies your preferred editing style. Those images sync to your design software, where text and graphics are added. The final composites export to social media with platform-specific optimizations applied automatically.
This end-to-end integration eliminates the constant export-import-adjust cycle that currently wastes time. Your creative decisions flow through the entire pipeline with AI handling technical execution at each step.
Predictive Editing Suggestions
Rather than waiting for instructions, future AI will analyze your images and proactively suggest edits based on common photography improvements and your historical preferences.
“This portrait would benefit from lighting enhancement. Would you like me to add directional light from the left?” Click yes, and the edit applies. Click no, and it remembers you prefer different approaches for similar situations.
This predictive assistance helps less experienced editors learn while speeding up workflow for everyone. The AI becomes a teaching tool as much as an execution tool.
Frequently Asked Questions About Gemini Photo Editing Prompts
Can Gemini photo editing work on any type of image?
Yes, Gemini can process most image types including portraits, landscapes, product photos, artistic compositions, and casual snapshots, though results vary based on image quality, resolution, and complexity. The AI performs best on well-lit, properly focused source images with clear subjects. Low-resolution, extremely dark, or heavily compressed images will show limited improvement since the AI cannot create detail that doesn’t exist in the source file. Group photos and complex scenes require more specific prompting to identify which elements you want edited.
Do I need photography experience to write good prompts?
No, photography experience helps but isn’t required to get good results from Gemini prompts. Basic understanding of concepts like brightness, color, and sharpness gives you enough vocabulary to write effective instructions. You can start with simple prompts like “make this brighter” and gradually add more specific terms as you learn what produces results you like. Many successful users come from non-photography backgrounds and rely on clear communication rather than technical knowledge. The key is describing what you see and what you want changed, not understanding the technical process behind making those changes.
How long does Gemini take to process photo edits?
Typically, Gemini processes most photo editing prompts in 15-30 seconds for standard edits, though complex transformations involving multiple changes, background replacement, or high-resolution images may take 45-60 seconds. Processing time depends on current server load, image size, and edit complexity. Simple adjustments like color correction or brightness changes process faster than complex operations like object removal or style transfer. During peak usage times, you might experience slightly longer waits. The processing happens server-side, so your device speed doesn’t significantly impact generation time.
Can Gemini maintain consistency across multiple photos?
Yes, Gemini can maintain character and style consistency across multiple photos when you establish references properly in your prompts. Start by creating a detailed character description or style specification in your first prompt, then reference that established character or style in subsequent edits. The AI maintains facial features, body proportions, color grading, and aesthetic choices across different images when you explicitly request continuity. This works particularly well for portrait series, brand content, and portfolio projects where visual cohesion matters. The key is being specific about what elements need to remain consistent.
What happens if I don’t like the edited result?
Simply, write a follow-up prompt describing what you want changed, and Gemini will modify the previous result while maintaining context from earlier edits. The conversational approach means you can refine iteratively without starting over. If the edit went completely wrong, you can also revert by uploading the original image again and writing a new, more specific prompt incorporating what you learned from the failed attempt. There’s no limit to iterations, so you can keep refining until you’re satisfied. Each edit builds on your previous instructions, giving you progressive control over the final result.
Does Gemini work better with certain file formats?
Yes, Gemini processes standard image formats like JPG, PNG, and WebP effectively, with JPG being the most commonly used and reliably supported format. PNG works well for images requiring transparency. Extremely large files or unusual formats may need conversion before upload. The system handles most photos from smartphones and cameras without issues. For best results, use images between 1MB and 15MB in size, avoiding both tiny low-resolution files and massive uncompressed RAW files. If you’re experiencing upload issues, convert to JPG at high quality and resize to approximately 2000-4000 pixels on the longest side.
Can I use Gemini-edited photos commercially?
Yes, you can generally use Gemini-edited photos commercially, but specific licensing depends on the original image rights and your Gemini account type. If you own the copyright to the original photo, you maintain rights to the edited version. However, check Google’s current terms of service for your specific account type, as commercial use policies can vary between free and paid tiers. The SynthID watermark embedded in edited images doesn’t prevent commercial use but does identify the content as AI-modified. For professional commercial work, verify current usage terms and consider whether your clients or industry have specific requirements about AI-edited content disclosure.
How do I know if my prompt is too vague or too specific?
Generally, if Gemini’s result doesn’t match your vision or looks inconsistent across similar photos, your prompt is probably too vague. If the AI seems confused or produces unexpected results despite your detailed instructions, you may be too specific with conflicting requirements. The sweet spot involves clear subject identification, one primary goal, measurable adjustments when possible, and constraints on intensity. Test your prompt on 2-3 similar images. If all three deliver consistent, expected results, your specificity level is right. If results vary wildly or consistently miss your intent, adjust by either adding more specific parameters or simplifying conflicting instructions.
Can Gemini remove people or objects from photos completely?
Yes, Gemini can remove people, objects, and distracting elements from photos by using content-aware fill that analyzes surrounding areas to generate realistic replacement textures. The success rate depends on background complexity and the size of the object being removed. Simple backgrounds like sky, walls, or grass work better than complex, detailed areas. Small objects remove more cleanly than large ones. For best results, specify exactly what to remove and mention that filled areas should match surrounding textures and maintain depth of field. Multiple small removals often work better than one large deletion.
Are there any safety or content restrictions on photo editing?
Yes, Gemini includes content policies that restrict editing certain types of images, particularly those involving minors, explicit content, attempts to create misleading identification documents, or edits intended to deceive or harm. The AI may refuse prompts that request inappropriate modifications to people’s appearances or ask to create false documentation. These restrictions protect users and prevent misuse. If your prompt gets rejected, review Google’s content policies and rephrase to focus on legitimate editing goals. Most standard portrait retouching, creative effects, and professional editing purposes work without issues.
What’s the difference between Gemini and Nano Banana Pro?
Actually, Nano Banana Pro is the image generation and editing model that powers Gemini’s photo editing capabilities. When you use Gemini for image work, you’re accessing Nano Banana Pro technology through Gemini’s conversational interface. Think of Gemini as the assistant you talk to, and Nano Banana Pro as the specialized engine handling the actual image processing. Google developed Nano Banana Pro specifically for advanced image editing with features like character consistency, conversational editing, and semantic understanding. When people refer to “Gemini photo editing,” they’re using Nano Banana Pro’s capabilities through Gemini’s accessible interface.
Can I batch process multiple photos with the same prompt?
Currently, Gemini doesn’t offer native batch processing where one prompt automatically applies to multiple images simultaneously. You need to upload each photo individually and apply your prompt to each one. However, you can speed this workflow by keeping your prompt text saved and pasting it for each new image, adjusting only image-specific details. For large-scale batch processing, traditional software like Lightroom or dedicated batch processing tools remain more efficient. The conversational, iterative nature of Gemini editing makes it better suited for individual images where you want to refine results through dialogue rather than applying identical changes to hundreds of photos.
Conclusion
Learning to write effective Gemini photo editing prompts isn’t about memorizing complicated formulas. It’s about understanding a simple truth: clear communication produces better results than vague wishes.
You’ve now got the building blocks. Specific subject identification. Single-focus goals. Measurable constraints. Preservation instructions. These four elements form the backbone of every successful prompt, whether you’re fixing a casual selfie or preparing commercial product shots.
The real power comes from practice. Each prompt you write teaches you something about how Gemini interprets language. Each result shows you what works and what needs refinement. Over time, you’ll develop instincts about phrasing that consistently delivers your desired aesthetic.
Start with the copy-paste examples in this guide. Use them exactly as written on your photos. Watch what happens. Then tweak them slightly to match your specific vision. That cycle of using, observing, and adjusting builds your prompt-writing skills faster than any theory.
Remember that photo editing AI is evolving rapidly. Capabilities that seem limited today will expand dramatically over the next 12-24 months. The fundamental skill of communicating your creative vision clearly will remain valuable regardless of which new features emerge.
So grab a photo that needs work. Pick one of the prompts from this guide. Apply it. See what happens. Then make it better with a follow-up prompt. You’re not aiming for perfection on the first try. You’re learning a new creative language, and the only way to master it is through actual use.
Your photos deserve better than default auto-enhance. Now you know how to get them there.
You May Also Like
 AI Models
GPT-5.5 vs Claude Opus 4.7 vs Gemini 3.1 Pro: Real Benchmark Results Compared
 AI Prompts
20 Funny Things to Ask ChatGPT When You Need a Study Break
 AI Tutorials
How to Use AI in 2026: My Honest Guide After Testing Every Major Tool
 AI Models
The Best AI Models: Types and Examples You Should Know
 AI Tool Reviews
DeepSeek vs. Claude, Grok, Qwen, and Gemini: Which AI Model Actually Fits Your Needs in 2026
 AI Tool Reviews